Friday, March 29, 2013

Hooo Loves Kiwi Lane?


It is time again to have a Weekend Whimsy project on Kiwi Lane's blog.  You wouldn't know that I really hadn't done any of this type of project before starting on the Kiwi Lane design team (shhhh, don't tell Kristy Lee).  Now I've gone through half a big bottle of Modge Podge and don't see myself stopping anytime soon!  ;-)
For my project featuring Quick Quotes papers, I knew I wanted to do a covered wooden piece.  I wasn’t sure if I was going to do some Spring letters to put on my mantle or the letters of my daughter’s name.  But while shopping in Spring project aisle at my Michael's, I found some fun bare wood shapes and KNEW this was what I had to do.  Actually, I should probably call this my daughter’s Weekend Whimsy 
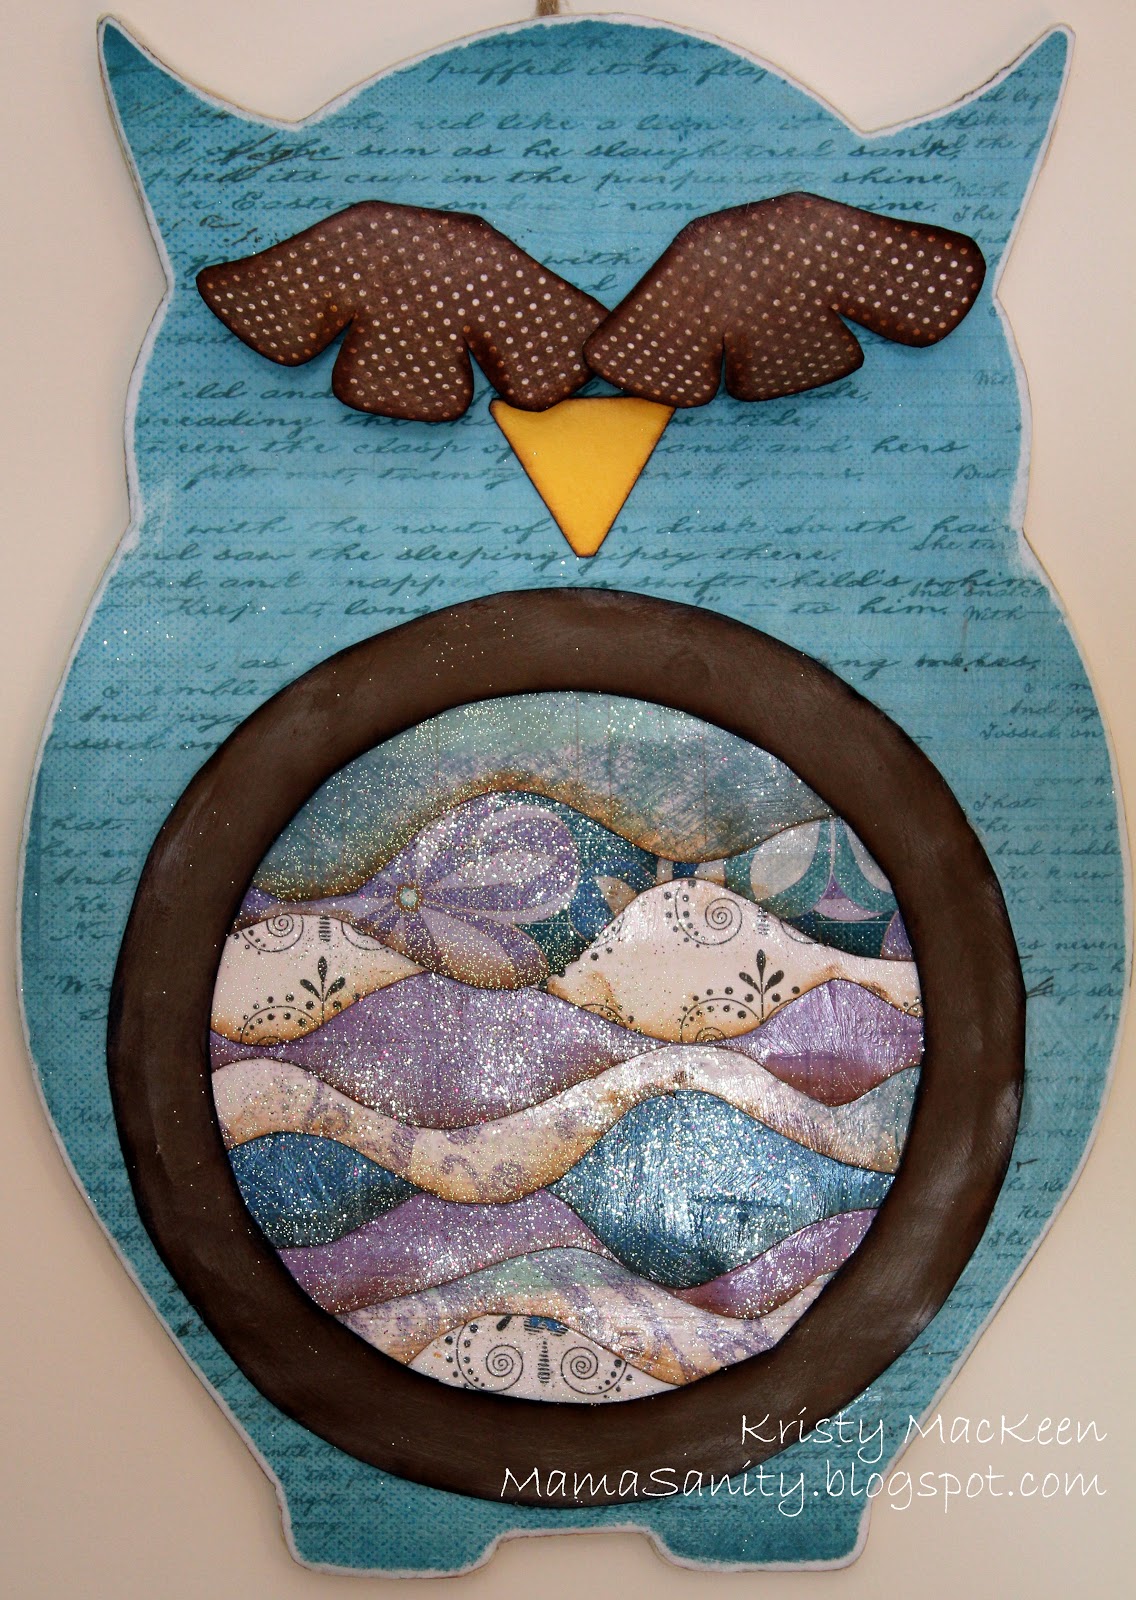
project because she picked out the owl.  And the Quick Quotes (QQ) papers were perfect to make a pretty little girl owl for her room.

Here is a peek of the bare and finished owl.


In looking at the templates featured for the month, I thought Mini Paisley would make good feathers on this little owl’s belly.  But before I could get to that point, I needed to prep the owl.

 
This was quick and simple to do.  I traced the owl on a piece of QQ Stowaway 200 paper. (I’m so happy that it fit exactly!)  After cutting out the owl, I used Modge Podge to attach the paper to the wood and laid out my templates on the form.  I ended up using Mini Paisley Place 2A, 2B, 3A, and 3B, Rings 4, Tiny Wildflower 1T, and Tiny Shapes 1T (not seen on my layout above) to make the owl.


To make it easier to lay out the “feathers” of the belly, I took an 8x8 paper and laid out all my cut Mini Paisley strips, varying the placement of the 2A, 2B, 3A, and 3B cuts within the square.  I used QQ Summer Breeze 100, 300 and 400 to make the layers.  (And yes, I did erase the pencil lines before I inked and Modge Podge’d the feathers).  Rings 4 was a perfect size to use a template to cut the circle of feathers and make a “highlight” ring for her belly.  The final step before attaching the ring to the owl was to paint it with Glossy Modge Podge, and sprinkle with a little glitter I had left over from another project.  (My daughter LOVED that touch when she saw the final project!)

All that was left was to use some QQ Stowaway 400 paper with my Tiny Wildflower 1T template to make some sassy eyelashes and Tiny Shapes 1T for a beak (after both kids asked where her nose was).  I covered everything with another layer of matte Modge Podge (except the belly feathers, which I tried not to touch).

 
Now it is just a matter of hanging her up in my daughter’s room – and I will have one very happy girl!  This really was a quick project.  The longest part was waiting for the Modge Podge to dry. 
I hope you enjoyed!
Don't forget - I have a giveaway going on here.
See you Monday with a new Paper Girls Challenge.  Have a Happy Easter!
Cheers!
Kristy

Tuesday, March 26, 2013

ScrapbookSteals.com How's To

Today, I was featured on ScrapbookSteals.com's How's To Day. I love masks.  They can be used in so many ways – with mists, with chalk, and in this case, with gesso.  Gesso was used to make the sunburst pattern of my ScrapbookSteals.com's MWM-Pearl 4 layout.  I thought it was the perfect background for this picture of my kids with their cousins.


What is gesso, you may be asking?  Gesso is a base coat with a slight texture. It is ideal for priming canvas, wood, metal, plastic, chipboard, paper and fabric prior to painting.  Gesso adds subtle texture (called "tooth") when applied, allowing a surface to accept paint and other mediums more easily.

I decided to use gesso as a masking agent because I wanted some texture in the white spaces.  Also, it allowed me to ink over the outer edges of the gessoed area to give the final product a glowing look.

For this project I gathered the following items and got to work:


For this project, I *should* have used washi tape to hold down my mask, if not, be prepared to get your hands a little messy.  Also suggest working on top of something you are going to throw away, like a scrap piece of paper or some wax paper.  I was using a self-healing mat and it took a lot of scrubbing to get it clean.

 
Using a sponge brush, I applied the gesso over the mask.  I tried using a standard paint brush, but found it left bristles in the gesso.  Now admittedly, I don’t have the highest quality brushes, so that could have been part of my problem.  ;-)  But the sponge brush gives you full coverage, very quickly


After pulling up the mask and letting the gesso dry fully, I grabbed my inks and sponge and started layering the colors over the areas covered with gesso.  I allowed the inks to overlap to give the blended affect.  The advantage of using this method over spraying the mask with mists, or inking directly on the mask, is the ability to go beyond the edges of the mask. 


After I was done inking, I wiped the ink of the gesso using a baby wipe, leaving it white once again. 


As quick and easy as that, you have a fun background for your project.  And any imperfections can be covered with your picture or other embellishments.  But I live by the motto that the imperfections are just a sign that something is homemade.
 
Here is the final product once again:

Give this a try!  Let me know what you think!!!
 
If you are interested in a giveaway, go down to my previous post and enter for a chance to win a set of Kiwi Lane templates!

Cheers!
Kristy

Monday, March 25, 2013

Let's Celebrate a Giveaway!

It is time to celebrate!!!  Not only am I celebrating my little guy turning 6 today (OMG!  Where has the time gone?!?), but I'm celebrating breaking that 100 follower mark on Mama Sanity!  Thank you, thank you, thank you to each and every one of you. 
 
To Celebrate, I'm giving away a set of Celebrate templates from Kiwi Lane Designs.  (Catchy, huh?)


Simply fill out this Rafflecopter form below, and I'll pick a winner on April 1st!

a Rafflecopter giveaway


Cheers!
Kristy

Tuesday, March 19, 2013

Kiwi Lane Tip Time Tuesday

Today was my turn to do a Tip Time Tuesday project on Kiwi Lane Designs' blog, featuring paper from Quick Quotes.  We were given paper from Stowaway, Crackled Rose and Summer Breeze to work with.  For today's project, I worked mainly with Stowaway...though I have plans for the other papers as well!

If you follow this blog, you know how I love Kiwi Lane templates for how easy and quickly they make putting together a layout.  They really help to see what it is going to look like before you make your first cut of paper.  Did you also know you can use them as a guide for stitching and embellishments?  Here are a couple quick tips for you on achieving this.

As I was laying out all the templates, I loved how Floral 3 became a focal point, and a perfect spot to add a little bling.  I mean, a girl has to have a little bling, right?!?  In the end, I changed up my layout from the framing stage, but Floral 3 stayed right where it was!

Tip 1: Using the Templates as a Guide for Embellishments:
 
 
We usually trace our templates on paper and proceed to cut them out.  In this case, I grabbed my silver pen and traced the template directly on to the background paper.  Using different shades of orange gems, I highlighted the flower shape.  It becomes a focal point, without overwhelming the page. 
Here are a few other layouts I've made using the templates as embellishment guides:

For this one, I used Cascade Trails 3A to add the jewels for just that little spot of sparkle.

I traced Rings 3 to make the circle on the side and then added Martha Stewart Candy Dots to pull all the colors together.

Tip 2: Using the Templates as a Stitching Guide:


Cascade Trails is probably one of my favorite border sets.  I love the beach and love taking pictures while we are there, including the picture I am working with on this project (from a cruise I was on in 2006).  The curves in Cascade Trails become easy wave templates for these pictures.  I love the movement in the Stowaway paper, but I wanted to highlight the water feel a little more.  So I decided to use Cascade Trails 3A as a stitching guide.  As you can see in the middle picture, I traced the template, and followed with pencil line with my paper piercer – and away I went with the stitching.  An hour later, I had an extra layer of waves added to my page.

And this is the final layout! 


What I used:
Paper:
Quick Quotes Stowaway 100, 300, 400
Quick Quotes Summer Breeze 300

Kiwi Lane Design Templates:
Accents 2
Floral 3
Cascade Trails 2A, 2B, and 3A
Paisley Place Mini 1A and 1B
Tiny Wildflower: 4T and 6T

Please note, this will probably be the ONLY time you will see me pointing to my belly on a layout.  I was 5 months pregnant with my first at the time this picture was taken, which was actually part of the point of this layout.
I hope I’ve inspired you to grab your templates and use them as not just a guide to cut paper, but as a guide for adding some embellishments (and stitching) to your page. 
Be sure to check back tomorrow for a little "Celebration" giveaway.  If you aren't a follower, today might be a good day to become one!  ;-)
Cheers!
Kristy

Monday, March 18, 2013

PGCB #28: A Photo Inspiration

Is it really Monday again?  I am amazed how fast it rolls around every week.  ;-) 

Today's Paper Girls Challenge is brought to you courtesy of Charity.  The challenge was to use this photo as an inspiration for our projects.


For my project, I pulled the colors and watercolor look for my card.  To make the background, I put a couple drops of Stampin' Up inkers on my mat and using a wet sponge brush, I dragged it across the card front.  I wanted a soft watercolor look to the rose in the background.  After inking the stamp, I lightly dabbed it on a wet wipe, then stamped it behind the "Thanks So Much" sentiment.


Recipe:
All Items are Stampin' Up and can be purchased through my site here.
Oh, Hello Stamp Set (Item #130733)
Markers: Pumpkin Pie (#105115), Going Gray, Island Indigo, Rich Razzleberry, Bravo Burgandy (105109)
Reinkers: Apricot Appeal (#105231), Rich Razzleberry (#115664), Island Indigo (#122932)

Thank you for visiting!  Be sure to check back tomorrow for my Kiwi Lane Tip Time Tuesday layout.  There will also be a give-away this week to celebrate the 100 FOLLOWER MARK!  WOOHOO!!!!!

Monday, March 11, 2013

Love at First Sight

Happy Monday!

I hope everyone is having a great day.  I am home with my little girl, doing one of the things I hate most of all about parenting - potty training!  Ugh!  But we are going to conquer this.

I thought it was a good time to do a layout about the day she was born.  It was love at first sight with this girl, for sure!  I can't believe it was almost 3 years ago.  I have loved watching her grow into a little lady - attitude and all.  ;-)  I started with the Amber 3 sketch on ScrapbookSteals.com.

 
To make this page, I used my Studio Calico Neverland Paper Add-on Kit (Crate Paper's Maggie Holmes: Remember This and Amy Tangerine's Yes, Please: Commit) for the paper.  I added some butterfly touches to background using Unity Stamps: Butterfly Garden and {...with her own wings} and Stampin' Up inks.  I soften the edges of the butterflies by tapping them with a wet wipe after they were stamped.  I am entering this layout at Unity's {be inspired} Challenge.  I also incorporated some prompts from the 213 in 213 Challenges at 2 Peas in a Bucket.  And you know I can't complete a layout without grabbing my Kiwi Lane templates.  I used Tags 1 and Tiny Tags 1.

This is actually page redo.  Gasp!  I know.  I am actually redoing a page.  The original was only the 3rd page I had ever done.  But from the day I finished the original, I was disappointed in it.  I'm not sure what it was I wasn't happy about.  It just never felt right. 


Thank you Shimelle (Adventures of Glitter Girl: Memoir Makeovers) for encouraging me to try my hand again at these pictures.

Cheers!
Kristy

Sunday, March 10, 2013

Glitter, Glitter, Everywhere!!!

Last week, 2 Peas in a Bucket's Scrap Your Stash video challenged us to use the glitter in our stash.  Well, now I have glitter EVERYWHERE!!!  (As some of my friends like to say, I have Glitter Herpes. LOL!!!)  But I love the affect it added to my Spring Artist Trading Cards:


I think it added just that right amount of glitz to go with the adorable Stampin' Up Dress Up Framelit Dies.  I am totally in love with these dresses!  I can't look at these cards without sing "Fab-u-lous".  When I found the word in the Fabulous Phrases set (also from Stampin' Up), I knew it was meant to be.  The glitter is also Stampin' Up, from an older collection of glitter that has been in my stash for quite a while.

I always make a couple extra die cuts when I'm making ATC's - you never know when those little hands are going to come help themselves to one of your cuts - so I decided to make a card with an extra cut:


I needed something a little bright and springy on this dreary day here in St. Louis.  Echo Park's Country Drive 6x6 fit the bill!

If you are interested in ordering the stamps or dies on these cards, you can go through my Stampin' Up store HERE.  And remember, SALE-A-BRATION continues until March 22nd - get free product for every $50 spent!

Cheers!
Kristy

Monday, March 4, 2013

Paper Girls Challenge #27: Snowflakes

Happy Monday!
Challenge #27 on The Paper Girls Challenge is up today...and it is SNOWFLAKES!  Kyla's challenge was perfect since we recently had some snow days here in the St. Louis area.  This was the first snow day (day off of school) ever for my son...and ME.  We don't get many of those kinds of days in Southern California.  ;-) 

For my project, I decided to do a layout about the first snow day (we had two in a row).  I pulled out my Kiwi Lane Templates to help layout my design.  I can't tell you HOW MUCH FASTER these templates make designing a layout.  As you can see, I didn't stick exactly to my "Before", but it still gave me an idea of where to go! 

 
Templates used: Rings 3 & 4, Tags 1, Strips 2" and 3", Photo 3x4 and Photo Mat 3.5 x 4.5
 
And here is how the final layout came out:


I used a top off a Studio Calico Butterfly Chipboard package to create my snowglobe affect.  (I like to upcycle when I can!)  Inside are a couple of wood veneer snowflakes and a little Martha Stewart Tinsel Glitter.  I rubbed the inside of the packaging with a Bounce sheet to help prevent a little static.  I think it worked pretty well because I don't have glitter sticking everywhere inside. 
 
Here is a close-up of the snowglobe:


I hope you enjoyed a look at my snowflake layout.  See you soon with more layouts and cards.  I feel like my mojo is back - and I'm going to take advantage of it!!!  :-)
 
Cheers!
Kristy