Monday, March 19, 2012

The Paper Girls Challenge #4

Welcome back to Challenge #4 for The Paper Girls Challenge.  We are love having everyone play along!  And thanks to everyone who participated in my stamping challenge last time.  It was fun to see everyone break out their stamps!

The challenge this time was a wonderful sketch by Sheryl. 


I switched it up a little by using a horizontal photo instead of a vertical one.  I loved using Authentique's Journey for this layout.  The blues and gray's played so nicely with the black and white picture.  Kevin (my almost 5 yr old) had fun picking out papers and embellishments with me for this layout.  I think he is a little scrapper at heart.  My honey also wrote the journaling this time around (a first I think!).


We look forward to seeing your layout's for this sketch!  Be sure to link them up on the Paper Girls Challenge blog.  You can also post them on our Facebook page for some extra ohhh's and ahhh's.  :-)

Cheers!

Monday, March 12, 2012

...and we have a winner!

Thank you to everyone who hopped along with my friends and me on the Scrapbook Steals blog hop.  It was so much fun seeing what everyone created, as well as all the wonderful comments.  I also wanted to say welcome to all my new followers.

Before I announce the winner, I wanted to answer a couple of the questions that came up during the hop:

  • This wreath took about 4-5 hours total to put together.  Once I got on a roll with the hot glue gun and buttons, it was pretty fast.  It was adding all the little touches at the end, like the tiny buttons and stick pins that took a lot of time.
  • I only covered about 3/4 of the wreath, leaving the back painted, but uncovered.  I held the wreath up to the wall to determine how far I had to go to cover it.
  • It took about 7 packages of Basic Grey buttons and brads to cover, but that is because I added a little depth by adding a second layer.  It looked great without that layer added too!

I hope I have inspired at least a couple of you to try this project on your own.  I know I will be making a second one for my daughter's room - as soon as I get more glue sticks.  ;-)

And now our winner.  Random.org picked comment 43 out of the 132 wonderful comments left over the weekend. 

So pretty! I've never done a wreath but I am thinking I should. Nice work Kristy!

Melissa, send me your mailing address to kmackeen1@gmail.com and I'll pull a little prize package together for you.

Until next time!

Cheers!

Saturday, March 10, 2012

Scrapbook Steals Blog Hop

Welcome to the first ever Scrapbook Steals blog hop.  You should have come here from the Scrapbook Steals Blog page.  If not, head back over and start from there.  Don't forget to visit everyone's pages and leave a comment.  Scrapbook Steals will draw a name from all the comments to win a $20 Scrapbook Steals gift certificate.  Every comment is a chance to win!  How great is that!!!

I was beyond honored when Kristy Lee asked me to join in the fun. We have so many wonderfully talented girls part of this hop.  I just hoped I could live up to it.  :-)  When we were asked to create with Basic Grey Buttons and Brads, I was in heaven.  I love the colors that Basic Grey uses.  I went through a number of different ideas about what I wanted to do - from a scrapbook page to a topiary.  I finally settled on a button wreath.  I had never done one before and I thought it was time to add a little something crafty to my daughter's room, and this would a perfect time to kill two birds with one stone, as it were. 

So I set off to find what I needed to make one!  I used a white wreath form, a lot of glue sticks, some straight pins and, of course, the Basic Grey Brads & Buttons.


I sorted the brads and buttons according to size - with a little help from my little guy.


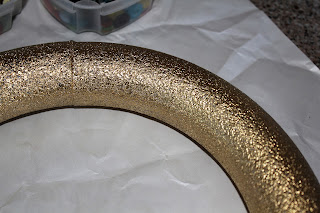
I spray painted the wreath gold so that if anything showed through when I got done layering buttons and brads, there would be a fun color showing.  Make sure you test your Styrofoam on an inconspicuous spot before you paint the whole thing.  Some paints don't mix with some Styrofoams.  I got lucky with mine and it all worked out just fine.


From there, it was a matter of layering buttons and brads all over the wreath.  I started with the largest buttons and kept working my way down through the sizes.  I discovered the heads of my stick pins were too small for the bigger buttons, but they worked perfect for the small buttons, so I used them as a pop of silver accents throughout the wreath.


Here is the final product.  My almost 5 year old son had fun working with me on this project - handing me the next buttons, brads, etc.  And now he has claimed this wreath as his own.  Guess I will be making another one for my daughter's room!


I hope you enjoyed taking a look at how I made this fun wreath. 

Here is the Blog Hop Order.  Be sure to visit everyone and leave a comment.  Remember - the more comments you leave, the more chances you have to win that $20 gift certificate! 
I will also be choosing a separate winner from the comments on my site.  You don't have to be a follower, but I would love it if you do!  I will use Random.org to pick a winner Monday morning.

Cheers!

Monday, March 5, 2012

PGCB Challenge #3

Hi!
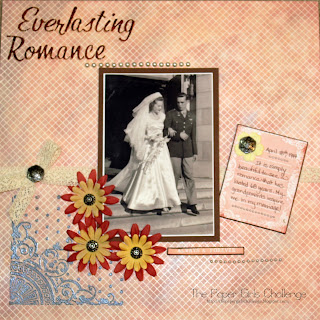
For Challenge #3 on The Paper Girls Challenge Blog, it was my turn to come up with the challenge.  Being that I love to stamp, it only seemed natural that I come up with a stamping challenge.  I love to make cards and use stamps in the background of my cards, but I often forget to use them on my scrapbook pages.  I figured this would be a good challenge, not just for myself, but other scrapbookers too!

I started this page with a white paper, embossed with a diamond pattern from the Presto Patterns Designer Series Paper by Stampin' Up. 


I used my chalk inks and rubbed a rust and yellow gold color on to the paper to make the diamond pattern stand out. I wanted to give it an antique look to go with the picture of my grandparents' wedding day 68 years ago.  I stamped the Everlasting Romance Stamp from Unity Stamp Company with Versamark and then embossed it with some pewter embossing powder.  I added some cream color Thickers from American Crafts.  They got lost on the page, so I colored them with some Copic markers.  Now you can actually read the title.  :-)  I was also amazed at how the journaling tag from My Mind's Eye's Laundry Line matched the colors I picked for the background.  It was purely by chance.  Some pearls, ribbons, flowers and brads and the layout was done. 

Here is the final product!


Thanks for stopping by.  Be sure to check back soon!

Cheers!